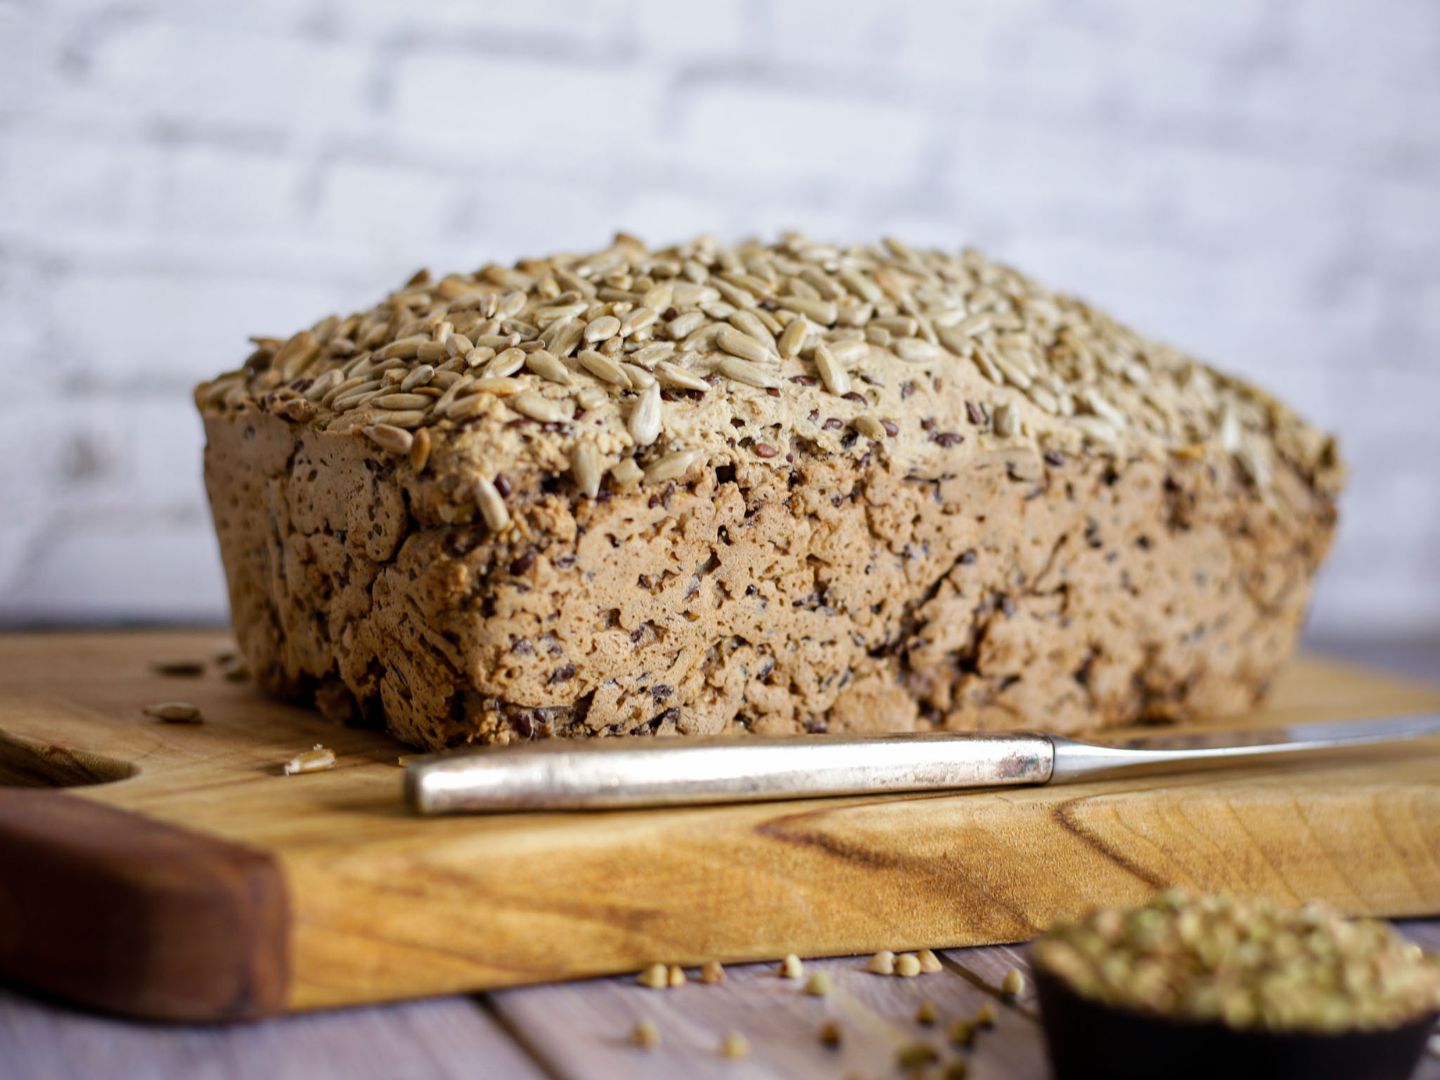
This homemade vegan gluten-free buckwheat bread recipe is so easy to make at home, won’t need many ingredients and you have many options to make it yours!

Whether you have food allergies, celiac disease or simply love buckwheat flour, this homemade bread is for you! It’s not dry and doesn’t crumble—which you often get with gluten-free bread!
I love this gluten-free bread recipe because it doesn’t require eggs or heaps of different flours to make it work! It works with buckwheat flour only.
This GF bread is made without kneading as we’re not using yeast to make it rise. I like to keep things simple and easy! And it’s a lot less time-consuming this way!
I think, there’s nothing better than enjoying a slice of warm, fresh bread—and I bet you agree. So, let’s get started!!!
Ingredients
- buckwheat flour
- starch, optional (tapioca starch, potato starch or corn starch)
- baking powder
- salt
- apple cider vinegar
- vegetable oil (I prefer olive oil)
- water
Binder
- option 1: activated flax seeds, sunflower seeds, pumpkin seeds
- option 2: chia seeds, flax seed meal or psyllium husk
Optional Ingredients
- maple syrup
- xantham gum
(see recipe card for quantities)
As you can see, this vegan gluten-free buckwheat bread recipe will give you a bunch of options… which I explain to you now.
This bread works with buckwheat flour only but adding starch does change the texture slightly and I do like it this way. I particularly like it with tapioca starch as it has that sort of gooey consistency to it.
The binder options are just different ways to make it. I love them all, however, I find that the bread made with psyllium gel creates the nicest texture. The activated seeds option is nice, too. Here, we soak the seeds in advance, making this buckwheat bread more nutritious.

Buckwheat flour
You can get buckwheat flour in your regular grocery store, in health food shops, or online. I made this bread with homemade buckwheat flour (ground buckwheat kernels) and it came out nicely!
Buckwheat has a distinct flavour. So, you need to really like it because it’s the main ingredient, obviously. Adding the starch takes off the bitterness a bit. Or you can add some maple syrup.
Tapioca Starch
The starch in this recipe is only optional, as already mentioned. It does change the texture and flavour a bit. Go and experiment and see what you like best!
Baking Powder
Make sure you use fresh baking powder that hasn’t been sitting in your pantry for more than a year. You can substitute it with bicarb/baking soda (see ‘substitutions’), too, as we’re adding vinegar anyway (the acid needed to make the bread rise!)
Apple Cider Vinegar
I like adding vinegar for extra flavour. Also, it helps to make your gluten-free bread rise more!
Vegetable Oil
Oil adds flavour, especially when using olive oil or a cold-pressed sunflower seed oil. It also makes this vegan gluten-free bread less dry! I don’t recommend leaving it out!
Binder
As we keep this recipe vegan, we can’t use eggs, obviously. Technically, we don’t even need a binder with buckwheat flour. However, a binder does create a nicer and not so crumbly texture which is why I prefer using one.
I recommend trying them out to see which option works best for you. Perhaps, begin with making it with psyllium husk. It’s hassle-free and quick!

Optional Ingredients
Maple syrup adds sweetness to your bread to counteract the slightly bitter flavour of the buckwheat flour.
Xantham gum is a great addition to your gluten-free buckwheat bread. It’s used in many gluten-free bread recipes to enhance the “springiness” and it acts as another binder as well.
Equipment
You won’t need anything special. Just a large mixing bowl, a wooden spoon or spatula and a small loaf tin/pan.
But, if you want to make the first binder option, with the activated seeds, you need a blender or a small food processor.
Instructions
Preparation
Depending on the type of binder you use, you need to adjust your preparation. With the activated seeds option, you need to prepare the seeds the night before, or at least 6-8 hours prior to the bread making.
You can also mix the binder options! I’ve made this bread with psyllium husk (only add 1 tablespoon (15 ml), mixed with ¼ cup / 60 ml water) and the activated seeds. It was sooo yum (see video!).

Option 1: soaked/activated seeds
Step 1: Place the seeds in a small bowl and cover with enough water. You want the water to rise about a third to a half of an inch above the seeds. The flax seeds in particular will soak up a lot of water.
Step 2: Let them soak overnight or for at least 6-8 hours. If there’s still water left, don’t worry. It’s actually good because it can help with the next step.
Step 3: In a small food processor or blender, blend the seeds until they start to stick together (see video). You can absolutely leave half of the seeds chunky. As long as you get that creamy, sticky texture, it’s fine!
You may need to add some water to achieve the right consistency. Your binder is now ready to be used in the recipe, as per the instructions below.
Option 2: Flax seed meal, chia seeds or psyllium husk
Step 1: Mix either the ground flax seeds, chia seeds, or psyllium husk with the right amount of water (see recipe card). Flax seed meal and psyllium husk will gel pretty much right away. You only need to wait for a minute or two.
Chia seeds will need to soak for about 15-20 minutes until all the water is soaked up. Occasionally, stir the chia seeds to avoid clustering.
Your binder is now ready to be used in the recipe, as per the instructions below.

How to make the buckwheat bread
Step 1: Preheat the oven to 175 °C / 350 °F and line a loaf tin with parchment paper, if you like. The bread can be removed easily if using a non-stick pan, too.
Step 2: In a large bowl, combine the dry ingredients (buckwheat flour, starch (if using), baking powder and salt) first. Then add the wet ingredients (water, vegetable oil, your choice of binder (prepared as described above) and apple cider vinegar).
I recommend adding the water little by little. Add 1 cup / 250 ml first, and then add more if needed. The amounts can vary a lot depending on the flour brand you use and which binder!
Step 3: Mix the ingredients well until you achieve a sticky bread dough. Pour the dough into your prepared loaf pan.
Sprinkle with seeds, if you like, and with some water. The water will create a crustier crust ;). I also like to cut the top with a knife (about half an inch deep) in the middle, so the crust opens neatly in the centre.
Step 4: Place the bread in the centre of your preheated oven and bake for 50 minutes to 1 hour. When done, the top should be crusty and when you knock on the bread, it should sound hollow.
Step 5: Remove the bread from the pan and allow it to cool on a cooling rack for a while. You can absolutely enjoy this bread warm and fresh out of the oven.
Once cool, you can slice it and use it as sandwich bread. If you like it toasted, you’ll need to keep it in the toaster for longer than regular bread.
I hope you enjoy your vegan gluten-free buckwheat bread!
Substitutions
Buckwheat flour: This gluten-free bread recipe is designed for buckwheat flour. Buckwheat flour acts differently than other gluten-free flour, or gluten-free flour blends. I have not tested it with any other flour, yet. So, I’m not sure whether it works.
Tapioca starch: Tapioca can be replaced with corn starch or potato starch, with slightly different results.
Baking powder: Replace with 1 ½ teaspoons of bicarb soda. Do not omit the vinegar in this case as you’ll need it as the rising agent.
Apple cider vinegar: Substitute with white wine vinegar or even balsamic vinegar. It can be omitted altogether, if not using bicarb as described above.
Storage
This gluten-free buckwheat bread will keep in the fridge in an airtight container or a freezer zip-lock bag for up to a week. The older the bread, the dryer it gets. But when toasted, it’s still very yummy!
I prefer to slice it once cooled and place it in a freezer bag to put in the freezer. In the freezer, the bread keeps 3-4 months.
Love Buckwheat Flour?
Check out my other buckwheat flour recipes here on my blog! Like this delicious, vegan gluten-free buckwheat banana bread! Or these gluten-free vegan banana pancakes with buckwheat flour!
📖 Recipe
Equipment
- 1 small loaf tin/pan
Ingredients
- 3 cups / 400 g buckwheat flour
- ½ cup / 60 g tapioca starch optional, see notes!
- 3 tsp baking powder
- 1 ½ tsp salt
- 1 tbsp apple cider vinegar
- 1 tbsp vegetable oil I prefer olive oil
- 1 cup / 250 ml water plus more, see instructions
Binder Option 1
- ½ cup / 80 g flax seeds
- 2 tbsp sunflower seeds
- 2 tbsp pumpkin seeds
Binder Option 2
- ¼ cup / 50 g chia seeds
- ¼ cup / 35 g psyllium husk
- ¼ cup / 35 g ground flax seeds mix with ¾ cup / 180 ml water!
- 1 cup / 250 ml water
Optional Ingredients
- 2 tbsp maple syrup
- 1 tsp xantham gum
Instructions
Preparation
Binder Option 1
- Place the flax, sunflower and pumpkin seeds in a small bowl and cover with enough water. You want the water to rise about a third to a half of an inch above the seeds.
- Let them soak overnight or for at least 6-8 hours. If there’s still water left, don’t worry.
- In a small food processor or blender, blend the seeds until they start to stick together (see video). You can absolutely leave half of the seeds chunky. As long as you get that creamy, sticky texture, it’s fine!
- You may need to add some water to achieve the right consistency.
Binder Option 2
- Choose either chia seeds, psyllium husk or flaxseed meal. Mix the chia seeds or psyllium husk with 1 cup of water, and the ground flax seeds with ¾ cup of water. Flax seed meal and psyllium husk will gel pretty much right away. You only need to wait for a minute or two.Chia seeds will need to soak for about 15-20 minutes until all the water is soaked up. Occasionally, stir the chia seeds to avoid clustering.
How to Make the Bread
- Preheat the oven to 175 °C / 350 °F and line a loaf tin with parchment paper, if you like. The bread can be removed easily if using a non-stick pan, too.
- In a large bowl, combine the dry ingredients (buckwheat flour, starch (if using), baking powder and salt) first. Then add the wet ingredients (water, vegetable oil, your choice of binder (prepared as described above) and apple cider vinegar).I recommend adding the water little by little. Add 1 cup / 250 ml first, and then add more if needed. The amounts can vary a lot depending on the flour brand you use and which binder!
- Mix the ingredients well until you achieve a sticky bread dough. Pour the dough into your prepared loaf pan.Sprinkle with seeds, if you like, and with some water. The water will create a crustier crust ;). I also like to cut the top with a knife (about half an inch deep) in the middle, so the crust opens neatly in the centre.
- Place the bread in the centre of your preheated oven and bake for 50 minutes to 1 hour. When done, the top should be crusty and when you knock on the bread, it should sound hollow.
- Remove the bread from the pan and allow it to cool on a cooling rack for a while. You can absolutely enjoy this bread warm and fresh out of the oven.


